Elm+TailwindCSSをVSCodeで書く


この記事は、Elm Advent Calendar 2021の25日目です。
はじめに
ElmとTailwindCSSをVSCodeで書くための環境構築や設定について説明します。
TailwindCSSがバージョン3となり、JITモードがデフォルト動作になるなど、バージョン2と変更点があるので参考にしてください。
ビルドツールはViteを使用しますが、PostCSSが使用できればなんでも大丈夫です。
対象読者
- Elm初心者
- TailwindCSSのバージョン3とPostCSSを使用したい人
- TailwindCSSとElmを使用する上でのVSCodeの設定を知りたい人
前提
- VSCodeがインストールされていること
- npmまたはyarnがインストールされていること(今回はyarnを使用)
Viteプロジェクト作成
Viteのプロジェクトを作成します
$ yarn create vite --template vanilla-ts elm-tailwind
これでViteプロジェクトの作成が完了しました。
VSCodeで開いておきましょう。
$ cd elm-tailwind
$ code .
TailwindCSSインストール
必要なパッケージをインストールします。
$ yarn add -D tailwindcss@latest postcss@latest autoprefixer@latest
TailwindCSSの初期コマンドを実行します。
オプションpをつけることでpostcss.config.jsの作成とTailwindCSSとAutoprefixerのプラグイン設定をしてくれます。
$ yarn tailwindcss init -p
Created Tailwind CSS config file: tailwind.config.js
Created PostCSS config file: postcss.config.js
module.exports = {
  plugins: {
    tailwindcss: {},
    autoprefixer: {},
  },
}
プロジェクトルートに生成されたtailwind.config.jsを以下のように修正します。
module.exports = {
  content: ["index.html", "./**/*.{css,ts,elm}"],
  theme: {
    extend: {},
  },
  plugins: [],
}
一旦起動してみる
TailwindCSSがちゃんと動くか確かめてみます。
srcディレクトリ以下のmain.tsを以下のように修正します。
 import './style.css'
+import 'tailwindcss/tailwind.css'

 const app = document.querySelector<HTMLDivElement>('#app')!

 app.innerHTML = `
-  <h1>Hello Vite!</h1>
+  <h1 class="text-red-500">Hello Vite!</h1>
   <a href="https://vitejs.dev/guide/features.html" target="_blank">Documentation</a>
 `
h1にクラスtext-red-500を追加したので赤文字でHello Vite!が表示されるはずです。実行してみましょう。
$ yarn dev
  vite v2.7.6 dev server running at:

  > Local: http://localhost:3000/
  > Network: use `--host` to expose

  ready in 189ms.
http://localhost:3000/と書いてあるので、ブラウザで開いてみます。

ちゃんと文字が赤くなってますね!
text-red-500をtext-blue-500と変更し保存するとホットリロードで即座に文字が青色になっていることも確認できます。
Elm環境の構築
いよいよElmの環境構築をしていきます。
必要なパッケージをインストールします。
$ yarn add -D elm elm-format
Elmの初期コマンドを実行します。
elm.jsonファイルを作成するか聞かれるのでyを押してエンターしてください。
$ yarn elm init
Hello! Elm projects always start with an elm.json file. I can create them!

Now you may be wondering, what will be in this file? How do I add Elm files to
my project? How do I see it in the browser? How will my code grow? Do I need
more directories? What about tests? Etc.

Check out <https://elm-lang.org/0.19.1/init> for all the answers!

Knowing all that, would you like me to create an elm.json file now? [Y/n]: y
Okay, I created it. Now read that link!
VSCodeでElmの拡張機能をインストールします。
VSCodeの拡張機能検索欄でelmと検索し、以下の拡張機能をインストールします。

Elm拡張機能ページ
Elmファイルの作成をします。題材はカウンターアプリです。
srcディレクトリ以下にMain.elmファイルを作成します。
module Main exposing (..)

import Browser
import Html exposing (Html, button, div, text)
import Html.Events exposing (onClick)


main : Program () Model Msg
main =
    Browser.sandbox
        { init = 0
        , update = update
        , view = view
        }


type alias Model =
    Int


type Msg
    = Increment
    | Decrement
    | Reset


update : Msg -> Model -> Model
update msg model =
    case msg of
        Increment ->
            model + 1

        Decrement ->
            model - 1

        Reset ->
            0


view : Model -> Html Msg
view model =
    div []
        [ button [ onClick Increment ] [ text "+" ]
        , div [] [ text (String.fromInt model) ]
        , button [ onClick Decrement ] [ text "-" ]
        , button [ onClick Reset ] [ text "Reset" ]
        ]
Elmファイルが作成できたので、main.tsに読み込ませましょう。
変更点が多くあるので、全て書き換えてください。
import { Elm } from './Main.elm'

import 'tailwindcss/tailwind.css'

Elm.Main.init({ node: document.querySelector('#app') })
すると、以下のようなエラーが出るはずです。
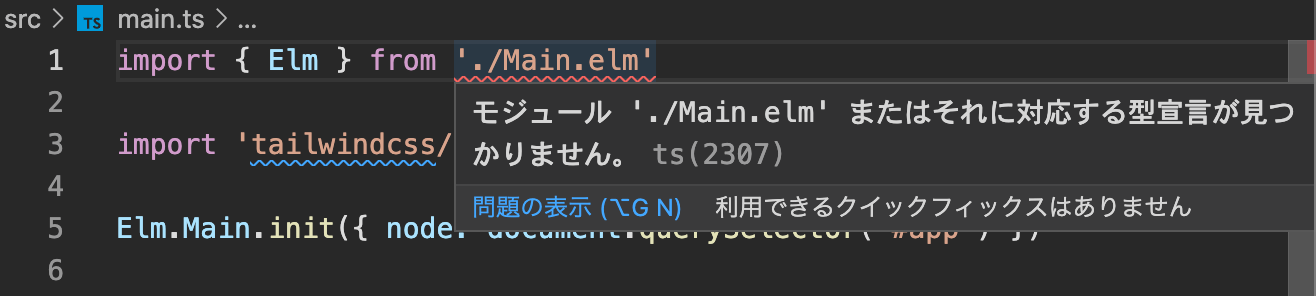
これは、Main.elmの型定義がないため発生しているエラーなので、型定義ファイル(.d.ts)を作成する必要があります。作成しましょう。
export var Elm: any;
型定義ファイルを作成したので、先程のエラーは解消しているはずです。
Main.elmの読み込みを行うことができたので、サーバーを起動しましょう(前回から停止していない人は実行しなくて大丈夫です)。
$ yarn dev
ブラウザで表示してみると、以下のようなメッセージが書かれたエラー画面が表示されているはずです。
[vite] Internal server error: Failed to resolve import "+" from "src/Main.elm". Does the file exist?
これは、ViteはデフォルトでElmファイルを読み込めないため発生しています。ViteでElmファイルを読み込むためには、プラグインが必要となります。
今回は@hmskさんが作成したElmのプラグインvite-plugin-elmを使用します(素晴らしいプラグインをありがとうございます!!)。
いつも通りパッケージをインストールします。
$ yarn add -D vite-plugin-elm
Viteのコンフィグファイルvite.config.tsを作成します。
import { defineConfig } from 'vite'
import elmPlugin from 'vite-plugin-elm'

export default defineConfig({
  plugins: [elmPlugin()]
})
プラグインを読み込んだので、ViteがElmを解釈できるようになるはずです。
もう一度ブラウザを見てみましょう。

ちゃんとカウンターアプリ(?)が表示されてますね!
TailwindCSSにnormalize.cssが含まれているためそっけない感じです。
+ボタン(もはやテキストですが)や-ボタンを押下すると数字が増減し、Elmアプリケーションが動いていることが確認できます。
また、右下にはElm Debuggerもちゃんと表示されてますね。
実は、tailwind.config.jsに拡張子がelmのファイルを認識するようにしているので、すでにTailwindCSSが使用できる状態になっています。
Main.elmを編集してみましょう。
module Main exposing (..)
import Browser
import Html exposing (Html, button, div, text)
+import Html.Attributes exposing (class)
import Html.Events exposing (onClick)
main : Program () Model Msg
main =
Browser.sandbox
{ init = 0
, update = update
, view = view
}
type alias Model =
Int
type Msg
= Increment
| Decrement
| Reset
update : Msg -> Model -> Model
update msg model =
case msg of
Increment ->
model + 1
Decrement ->
model - 1
Reset ->
0
view : Model -> Html Msg
view model =
div []
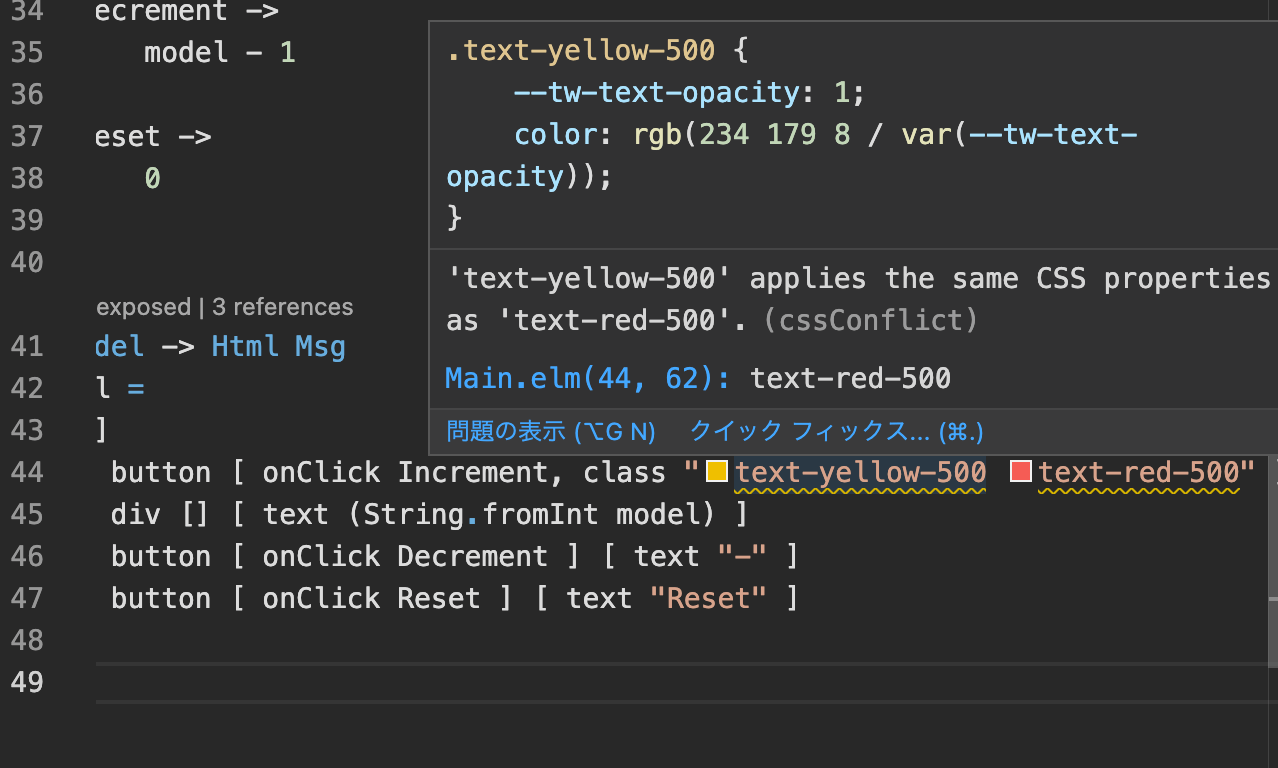
- [ button [ onClick Increment ] [ text "+" ]
+ [ button [ onClick Increment, class "text-yellow-500" ] [ text "+" ]
, div [] [ text (String.fromInt model) ]
, button [ onClick Decrement ] [ text "-" ]
, button [ onClick Reset ] [ text "Reset" ]
]
ブラウザを確認すると、ちゃんと文字が黄色になっています。

VSCodeの設定をしよう
ElmでTailwindCSSを書くことができたのですが、このままではいくつか不満点があります。
- 補完候補にTailwindCSSが表示されない
- TailwindCSSのLintが機能していない
上記2つはHTMLやJSXなどでTailwindCSSを書いていれば普通に行えることなのですが、初期設定だとElmではできないためストレスになります。
しかし、VSCodeのTailwindCSSプラグインは正規表現でTailwindCSSの補完候補を出すかどうかを設定できます。
そこで、Elmのclass関数に渡す文字列をTailwindCSSの補完対象とすればElmでも快適にTailwindCSSを書くことができます。
まずは、VSCodeのコマンドパレットを開いて(Macなら⌘+shift+p、Windowsならctrl+shift+p)、>setting jsonなどで検索すると、VSCodeの設定ファイルをJSON形式で開かれます。

すでに色々な設定があるかもしれませんが、下記を自分のsetting.jsonに追加してください。
{
  "[elm]": {
    "tailwindCSS.experimental.classRegex": ["\\bclass\\s+\"([^\"]*)\""]
  },
  "tailwindCSS.includeLanguages": {
    "elm": "html"
  }
}
設定を追加すると、class関数に文字を入力する際、補完が出てくるはずです。Lintも行われており、重複するCSSプロパティがあるとワーニングを出してくれるようになりました。

最後に
以上でElm+Tailwindcss(+Vite)をVSCodeで書くための手順となります。
参考にした記事やリポジトリなどの紹介をします。
ABAB↑↓BAさんによるVite+Elmの構築方法。
Vite+Elmの構築パートはこの記事をほとんど参考にしてます。
本記事には書かれていないビルド後のページ参照方法が書かれているため、ぜひチェックしてみてください。
@hmskさんのvite-plugin-elmリポジトリ。お世話になってます。
Elm内でTailwindCSSを補完する方法は下記のIssueを参考にしました。
おまけ
本記事ではMain.elmの型をanyにしましたが、@うじまるさんのMain.elm.d.tsを参考に型付けすることができます。今後portなどを使用する場合、こちらも参考にしてみてください。
Discussion