iTranslated by AI
How to Train the Style-Bert-VITS2 High-Quality TTS Model on Google Colab and Use it in Aivis Speech



Promotion
This article is a contribution to the Advent Calendar of "AI Voice Creation Technology Research Group," one of the largest audio-related Discord servers in Japan.
Actually, this article was only possible thanks to everyone in the "AI Voice Creation Technology Research Group."
I would like to express my gratitude once again.
In the Discord server, high-level outputs and discussions are always taking place, and I am very much looking forward to this Advent Calendar as well.
Introduction
Recently, the synthetic speech community has been very active, and since the view count of my previous article "Memo on How to Use Style-Bert-VITS2" has been increasing again, I've decided to jump on the trend and write in detail about training this time.
(In the previous article, I only briefly touched upon the training method.)
If you are not familiar with Style-Bert-VITS2, please check out the following article:
And I plan to use the trained model with a synthetic speech software called Aivis Speech.
Aivis Speech is a groundbreaking software that allows you to use SBV2 synthetic voices with an intuitive UI compatible with VOICEVOX.
Furthermore, I've heard that it uses a higher-performance g2p than the one currently used in SBV2.
In any case, besides being easy to use as a UI, the quality and speed of synthetic speech have significantly improved.
Thinking it might become the mainstream of synthetic speech in the future, I would like to go as far as trying it out this time.
Article Structure
By reading this article, you will be able to do the following:
-
Create a Style-Bert-VITS2 (SBV2) model using the free version of Google Colab
- Organize data for training Style-Bert-VITS2 (SBV2)
- Prepare audio data
- Split audio data into a trainable format
- Perform transcription of the split training data
- Organize it according to the SBV2 training format
- Train Style-Bert-VITS2 (SBV2) on Google Colab
- Evaluate the trained models and select the best-looking one
- Perform synthetic speech on Google Colab using the trained model
- Organize data for training Style-Bert-VITS2 (SBV2)
-
Use the trained model with Aivis Speech
- Convert the trained model into a format usable with Aivis Speech
- Register the trained model on Aivis Hub
- Perform synthetic speech on Aivis Speech
Note that code explanations and such will be included in the actual ipynb files to be used.
In this article, I will mainly describe the procedure to proceed with the training.
Preparation
In this project, we will use the Google Colab environment to train SBV2. By using Google Colab, you can perform high-speed training even on a PC that does not have a GPU.
However, using the WebUI on the free version of Google Colab is against the terms of service, so we will perform the training without using the WebUI this time.
Training SBV2 using Google Colab
First, we will train SBV2 using the free version of Google Colab. Here are the steps to do so.
Advance Preparation
Clone the Repository
First, please clone the following repository which contains the training ipynb files and other resources:
git clone https://github.com/personabb/colab_AI_sample.git
This repository contains sample code for using various generative AI models on Google Colab. For usage, please refer to my past articles.
Upload the Repository to Google Drive
After cloning, place the folder directly under MyDrive on your Google Drive.
The following folder structure is assumed:
MyDrive/
  └ colab_SBV2train_sample/
          ├ model_assets/
          ├ inputs/
          ├ dict_data/
          ├ Data/
          ├ SBV2-prepare.ipynb
          ├ SBV2-prepare_ITA.ipynb
          ├ SBV2-train.ipynb
          ├ SBV2-evaluation.ipynb
          └ SBV2-ONNXconvert.ipynb
Prepare Training Audio Data
To train SBV2, you need to prepare at least 10 minutes of audio data.
While "the more, the better" isn't always true, if you have high-quality audio data, training with a longer duration is expected to improve the model's quality.
Additionally, the audio data must be a dataset containing only the voice of the single speaker you want to train. Therefore, any audio data containing voices other than the speaker you want to train cannot be used in the entire dataset.
You can have any number of files or any length of audio files, but you must adhere to the following:
- A total of at least 10 minutes.
- Audio data must consist of only one person.
In this article, we will use the live voice data from "Amitaro's Voice Material Workshop" below. (Please be sure to check the Terms of Use of "Amitaro's Voice Material Workshop" regarding usage.)
We will download "04_対談・元気にパズル" (Dialogue/Energetic Puzzle) and "05_ひそひそ" (Whisper) from there, and use the files "2024-04-28_対談あみたろのみ.wav" and "2024-06-03_SVB2.wav" included in them.
Store the Prepared Audio Files in the inputs Folder
Create conversation and whisper folders inside the inputs folder.
Then, upload the file "2024-04-28_対談あみたろのみ.wav" into the conversation folder and "2024-06-03_SVB2.wav" into the whisper folder.
The folder structure will look like this:
MyDrive/
  └ colab_SBV2train_sample/
          ├ model_assets/
          ├ inputs/
          |    ├ conversation/
          |    |    └ 2024-04-28_対談あみたろのみ.wav
          |    └ whisper/
          |         └ 2024-06-03_SVB2.wav
          ├ dict_data/
          ├ Data/
          ├ SBV2-prepare.ipynb
          ├ SBV2-prepare_ITA.ipynb
          ├ SBV2-train.ipynb
          ├ SBV2-evaluation.ipynb
          └ SBV2-ONNXconvert.ipynb
Formatting the Training Data
When You Have Prepared Only Audio Data
From here, we will actually use the ipynb notebooks. Please open "SBV2-prepare.ipynb".

Here, please change the following part in the 3rd cell:
model_name = "amitaro"
Specify the name of the model you want to create in this part. Furthermore, the name specified here will be used in subsequent steps.
(In this article, we will continue with amitaro)
Execute the notebook by selecting "Runtime" -> "Run all".
After execution, an amitaro folder should be created within the Data folder. It is successful if a raw folder and esd.list are created inside it, and audio files—split into approximately 10-second segments from the original video—are saved in the raw folder.
The contents of esd.list should look like this:

From left to right, it is output as:
"Audio File Name" | "Model Name" | "Language (JP for Japanese)" | "Audio Transcription Text"
(In other words, there is no problem if you prepare esd.list in this format even without using the ipynb mentioned above.)
When You Have Prepared Corpus Audio such as the ITA Corpus
When You Have Prepared Corpus Audio such as the ITA Corpus
This is a slight digression, so I'll write it here.
When you prepare corpus audio like the ITA Corpus, you are essentially reading a script, so you just need to reflect the script text in esd.list.
For example, "Amitaro's Voice Material Workshop" also provides ITA Corpus voice data.
Let's assume we use this.
Script text for the ITA Corpus can be obtained from the following repository:
We will load that and create esd.list.
First, create the Data/{model_name}/raw folder.
Replace {model_name} with whatever name you want for the model you are creating. For example, amitaro_ITA. Let's assume we use this here.
Next, put the audio data folders directly into the Data/amitaro_ITA/raw folder.
For the ITA Corpus, there would typically be two audio folders: emotion and recitation.
Store them like Data/amitaro_ITA/raw/ITA_emotion and Data/amitaro_ITA/raw/ITA_recitation.
After that, execute "SBV2-prepare_ITA.ipynb".
You should then see that Data/amitaro_ITA/raw/esd.list has been created.
Actually Training SBV2
Basics
To train, set the runtime type to T4 GPU, and then execute "SBV2-train.ipynb" from the very first cell.

Naturally, as before, please appropriately change the model name and folder path in the 3rd cell.
Also, you can change the training parameters in the 5th cell, but basically, you can leave them as they are.
If you do change them, refer to the comments for guidance.
In particular, if you want to achieve synthetic speech in languages other than Japanese, set use_jp_extra = False.
On the other hand, if Japanese synthetic speech is sufficient, execute with use_jp_extra = True.
After execution, if you have style_vectors.npy, config.json, and amitaro_exxx_sxxxx.safetensors in the model_assets/amitaro folder on Google Drive, it is successful.
Please wait, as the 6th and 7th cells take a very long time.
If the training stops midway in the 7th cell, you can resume from where it left off by executing all cells again except for the 6th cell (preprocessing).
(Do not execute the 6th cell.)
(Optional) Setting Up a User Dictionary
A user dictionary is something like this:

For an explanation of the dictionary itself, please refer to my previous article.
This user dictionary can also be reflected during training.
Prepare a default.csv with the user dictionary reflected and upload it to the dict_data folder on Google Drive.
After that, set dir_update_FLAG to True in the 4th cell, and then execute from the top.
After the 6th cell is completed, looking at Data/amitaro/esd.list.cleaned, you can see that "phones", "tones", and "word2ph" have been appended to the transcriptions. (For details, see here)
If the user dictionary setting is successful, the "phones" part should be output exactly as set in the user dictionary.
When Session Limits on the Free Version of Google Colab are Strict
(Optional) When Session Limits on the Free Version of Google Colab are Strict
One free account can use the T4 GPU for approximately 4 hours, but SBV2 training can take longer than that.
In such cases, you can create two or more accounts and move the entire folder to use an additional 4 hours of T4 GPU.
However, moving this folder is quite a hassle.
Therefore, I will describe a method to use an additional 4 hours of T4 GPU by referencing the main account's folder from a sub-account using the "Shared Folder" and "Shortcut" features, without moving the folder itself.
Tasks on the Main Account
On the main account side, you need to share the folder you are using with the sub-account.
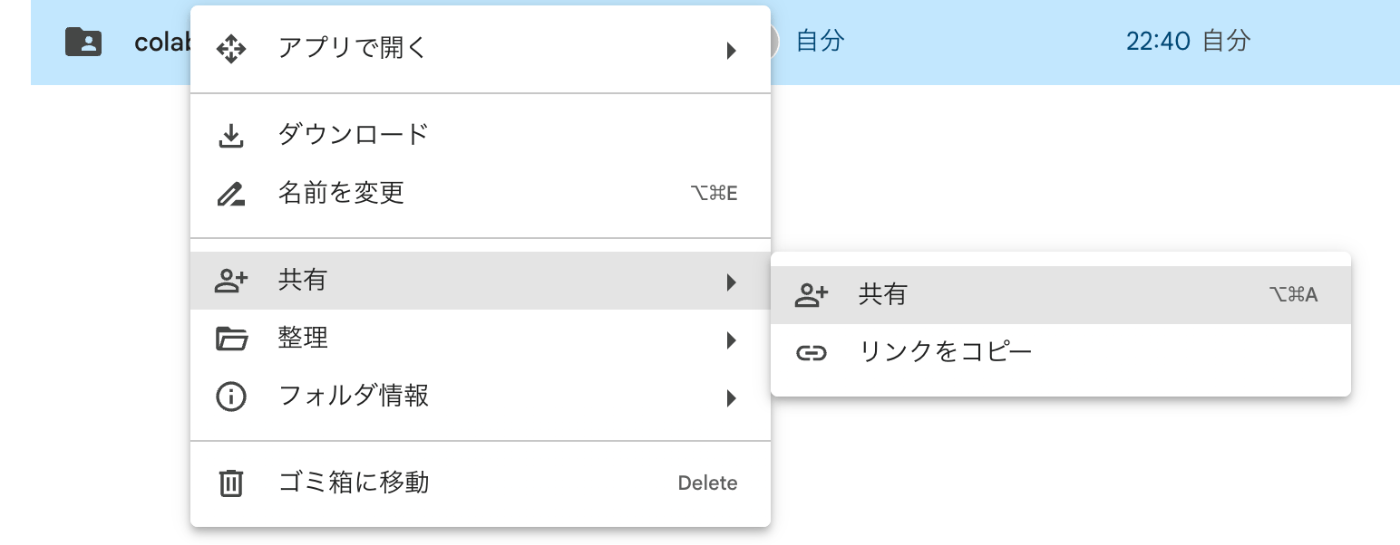
As shown in the image below, right-click the colab_SBV2train_sample folder and select "Share".
After this, add the email address of the sub-account to share it.
That's it for the operations on the main account side.
Tasks on the Sub-account
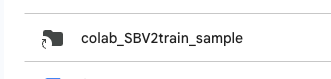
Log in to Google Drive with the sub-account and look at the "Shared with me" section. You should see that the colab_SBV2train_sample folder has been shared from the main account, as shown in the image below.

Then, right-click the colab_SBV2train_sample folder and click "Organize" -> "Add shortcut".

After that, create a shortcut directly under "My Drive" as shown below.

Then, you can see that colab_SBV2train_sample can be referenced from the sub-account's My Drive.
And then, enter the shared drive via the shortcut from the sub-account and execute the desired ipynb.
In this state, you can mount the main account's Drive via this shortcut from Google Colab, so if you train on the sub-account side and a new weight file is saved, it will be stored in the main account's Drive.
Also, since the Google Colab limits for the sub-account are independent of the main account, you can create multiple sub-accounts and repeat the same process to use Google Colab almost without worrying about time constraints.
Evaluating SBV2 Model Weights
Execute cells 1 through 4 of "SBV2-evaluation.ipynb" from the top.
As before, please modify the paths and model names in the 3rd cell as appropriate.
Once the 4th cell is completed, the model name and evaluation score will be displayed in the console.

Evaluation Results
11-29 13:52:56 |  INFO  | speech_mos.py:101 | amitaro_e4_s1200.safetensors: 1.9102470576763153
11-29 13:52:56 |  INFO  | speech_mos.py:101 | amitaro_e12_s4000.safetensors: 1.8772405087947845
11-29 13:52:56 |  INFO  | speech_mos.py:101 | amitaro_e18_s6000.safetensors: 1.8724862784147263
11-29 13:52:56 |  INFO  | speech_mos.py:101 | amitaro_e15_s5000.safetensors: 1.8204307854175568
11-29 13:52:56 |  INFO  | speech_mos.py:101 | amitaro_e20_s6810.safetensors: 1.8181726783514023
11-29 13:52:56 |  INFO  | speech_mos.py:101 | amitaro_e6_s2000.safetensors: 1.813872441649437
11-29 13:52:56 |  INFO  | speech_mos.py:101 | amitaro_e9_s3000.safetensors: 1.7941004931926727
A higher score doesn't necessarily mean high-quality synthetic speech is achieved, but it can be used as one indicator.
I recommend selecting a few candidates from the ones with high scores and comparing the audio you want them to speak.
This time, I will use amitaro_e18_s6000.safetensors, which is relatively high-ranking (third from the top) and is a weight from the latter half of the training.
Checking SBV2 Synthetic Speech
As in the previous chapter, we will use "SBV2-evaluation.ipynb".
Based on the results from cell 4, specify the name of the weight you want to try in cell 5.
For example:
safetensor = "amitaro_e18_s6000.safetensors"
Then, execute up to cell 9.
You should be able to hear the voice spoken for each style.
Below is the part performing synthetic speech:
sr, audio = model.infer(text="そうだね!楽しみだね!", style = "Neutral")
You can change the content of the speech by modifying the text="そうだね!楽しみだね!" part.
With this, you have completed the process from training with your own dataset to generating synthetic speech.
Also, you can change the Style with the infer method. The default is Neutral.
On the other hand, we trained this time by separating the folders into conversation for normal dialogue voice and whisper for whispering voice.
In this case, you can specify both of the above as Styles, and each will generate synthetic speech of different qualities.
Use it as follows:
sr, audio = model.infer(text="えー!ほんとかなあ", style = "conversation")
sr, audio = model.infer(text="こんにちは、今日もお疲れ様。", style = "whisper")
Using the Trained Model with Aivis Speech
So far, we have trained an SBV2 model using "Amitaro's" training data on Google Colab. From here, I would like to make the model we trained ourselves usable in Aivis Speech.
To use a trained SBV2 model in Aivis Speech, it is necessary to convert the model into the "AIVM / AIVMX file" format.
Currently, we have three files:
- safetensor file
- style_vectors.npy
- config.json
These will reportedly become an "AIVM" file after conversion, which is used for high-quality synthetic speech on GPU-equipped machines.
On the other hand, conversion requires one more thing: a file in "ONNX" format. The "ONNX" file will become an "AIVMX" file after conversion, enabling high-speed synthetic speech even on a CPU.
Therefore, we will first create an "ONNX" file using the three types of files mentioned above. After that, we will create the "AIVM / AIVMX files" from the generated "ONNX" file using a web tool called "AIVM Generator".
Converting to ONNX Format
Run "SBV2-ONNXconvert.ipynb" sequentially from the top. (A CPU runtime is sufficient.) As before, modify the paths and model names in the 3rd cell.
Specifically, you also need to specify the name of the source safetensor file.
model_name = "amitaro"
safetensor = "amitaro_e18_s6000.safetensors"
Set the above correctly and execute the entire ipynb.
Then, a new file named model_amitaro.onnx should be generated in the model_assets/amitaro/ folder. This file is the ONNX file.
Converting to AIVM/AIVMX Files
At this point, we have obtained the following files:
- safetensor file
- style_vectors.npy
- config.json
- ONNX file
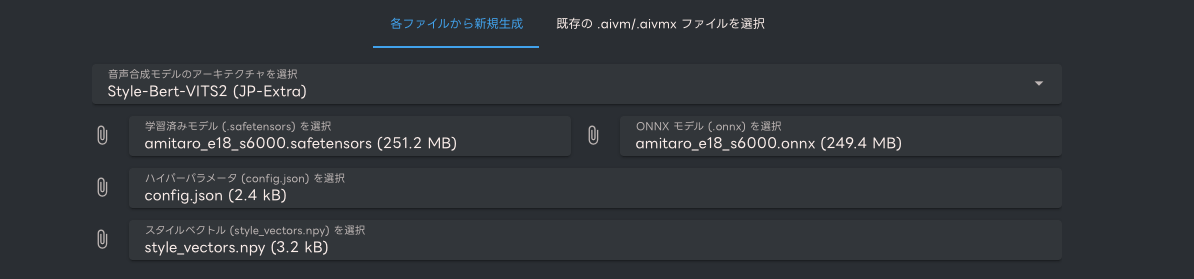
Take these files and connect to the web tool "AIVM Generator".

Select the four files you have obtained so far in the following section:
Next, enter the required information in "2. Metadata Editing."

Finally, click the button in "3. Generate AIVM / AIVMX File" to start the generation.

After generation, the AIVM / AIVMX file will be downloaded.
Using with Aivis Speech
Download Aivis Speech
Aivis Speech itself can be downloaded for free from the link below:
It can be obtained from the "Free Download" button below.

My environment is an "M2 Mac," so I specify it as shown below and click "Installer Version" to download.

Run the downloaded "AivisSpeech-macOS-arm64-1.0.0.dmg" to complete the installation.
By the way, the first launch involves various initialization processes, so it takes a long time to start. This happens only the first time, so please be patient.
Trying the Default Model of Aivis Speech
After launching, you should see a screen like the one below.
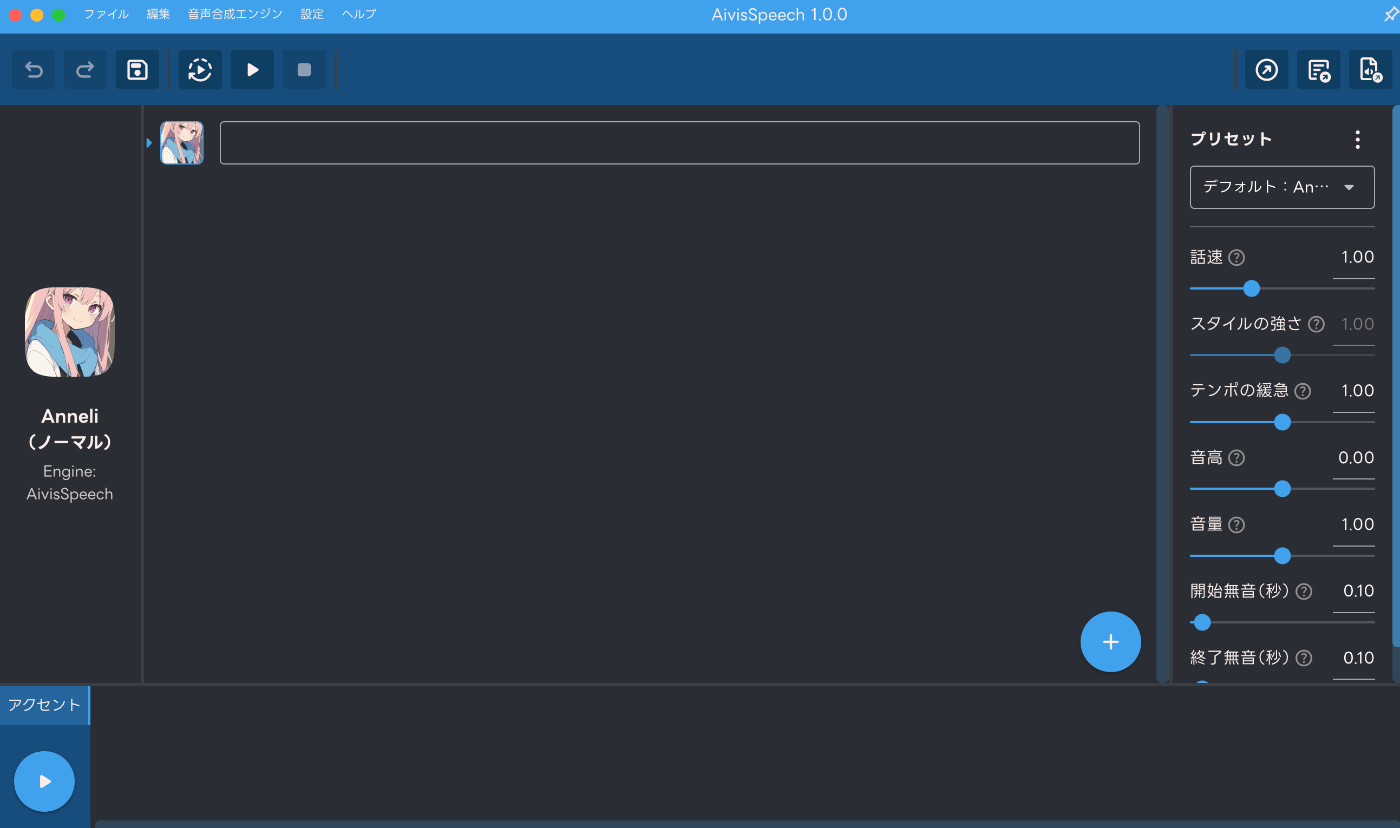
Currently, a model named "Anneli" is available by default. You can enter the text you want to speak in the center box and click the "play" (triangle) button at the bottom left to play the synthetic speech.
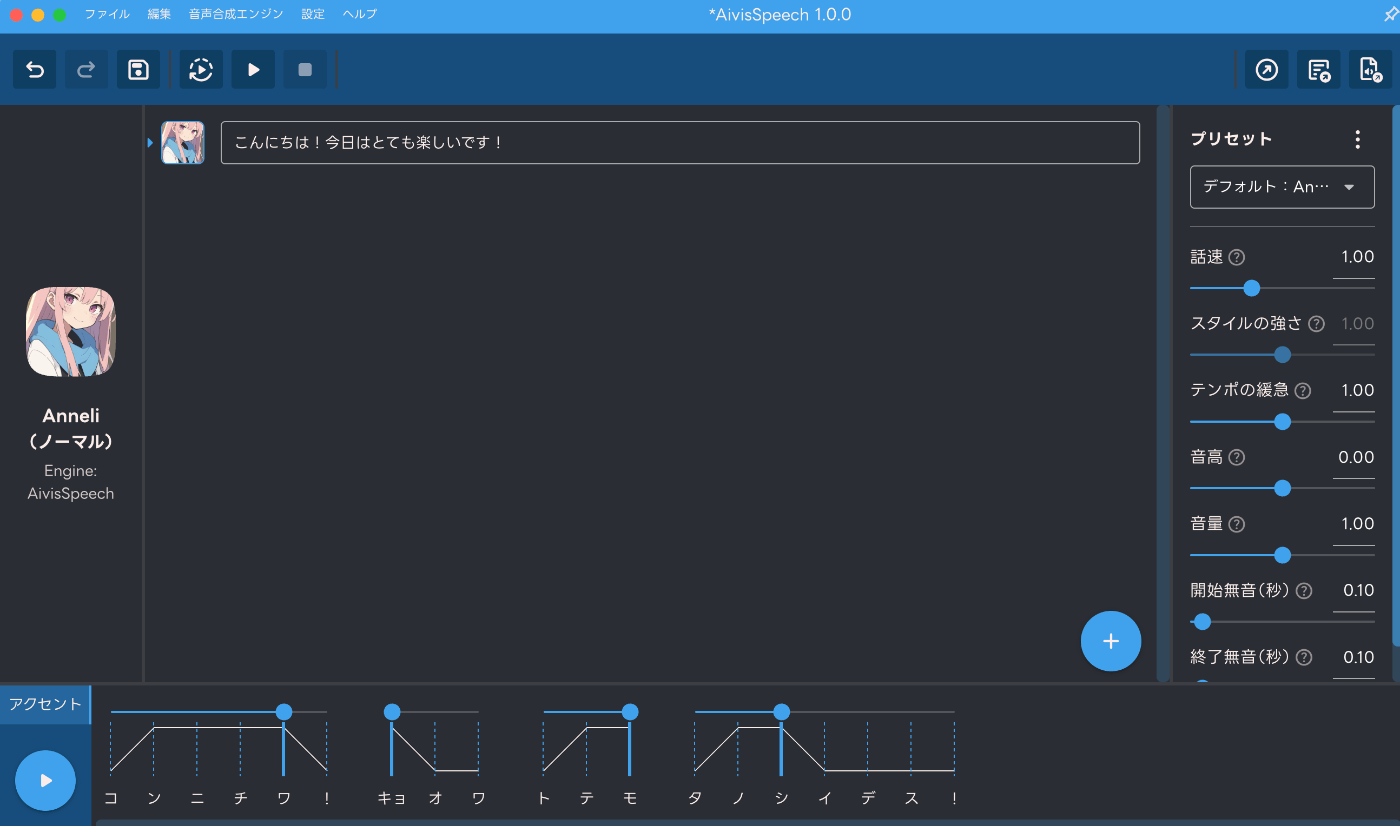
If you want to create a second sentence, click the "+" mark at the bottom right. Also, you can adjust various playback parameters by changing the sliders on the right.
Furthermore, by clicking the icon to the left of the input text, you can change the model (if it's imported) or change the Style.

Aivis Speech internally uses SBV2.
SBV2 analyzes text using a natural language processing model called BERT to extract features including emotional expression, and then synthesizes speech based on that.
Therefore, it reads happy sentences happily and sad sentences sadly.
It's quite interesting to try different things.
Importing the AIVMX File
Click on "Settings" -> "Manage Synthesis Models."

Click on "Install/Update" at the top right.

In "Install from file," select the "AIVMX file" you converted earlier and click "Install/Update" at the bottom right to import the model into Aivis Speech.

Playing in Aivis Speech
As explained earlier, try playing the synthetic speech while changing the model or the Style.
We have successfully performed synthetic speech in Aivis Speech based on the model we trained ourselves.
Summary
So far, we have organized training data from existing live audio and performed SBV2 training.
Then, we described the flow of converting the trained model and using it in Aivis Speech.
If you want to further improve the quality of the trained model, consider the following strategies:
- Separate models instead of separating Styles
- I feel it is more stable to prepare separate models for conversation audio and whispering audio.
- Increase transcription quality even if it means reducing the amount of audio data
- My experience is that even with only 10-20 minutes of training audio, quality improves if the transcription is perfect.
Thank you for reading this far.
References
Outputs from the members in the "AI Voice Creation Technology Research Group" Discord server
Discussion