Mojoの画像処理(PIL・OpenCV)がPythonより3倍遅く3倍速い
Mojo
兎角
公式のチュートリアルではアプリケーションを作っているようだが、これはライフゲームという数理的なものであり、何か実務的な機能性の実装を
本記事には、「
ファイルの扱い
少し詳しく説明すれば、単に画像をファイルとして読み込むことならばできる。
先ずは普通にテキストファイルを読み込む方法を述べよう。
(mojo_env) $ mojo
Welcome to Mojo! 🔥

Expressions are delimited by a blank line.
Type `:quit` to exit the REPL and `:mojo help` for further assistance.

  1> with open('sleeping.mojo', 'r') as f:
  2.   print(f.read())
from time import sleep

fn main():
    print('exit the program with Ctrl+C')
    while True:
        print('sleeping 1 second')
        sleep(1.0)

  3>
同様にして画像も読み込むことができる。
1> with open('zenn.jpg', 'r') as f:
2. print(f.read())
3.
����JFIF���ICC_PROFILE�lcms0mntrRGB XYZ �
,acspAPPL���-lcms
des8cprt@Nwtpt�chad�,rXYZ�bXYZ�gXYZ�rTRC
gTRC, bTRCL chrml$mluc
enUSsRGB built-inmluc
enUS2No copyright, use freelyXYZ ���-sf32
J����*��������������XYZ o�8��XYZ $����XYZ b���Y�araff�
Y�araff�
Y�araff�
[chrm��T{L���&f\��C
!"$"$����"�����
��|H(^O�~P_~_�}��r�/�Ǹ�>�R�iB��ϩ˦
�}0pmt�i�� ���οjr�ېG���_?xg�@�8�����Xsǩ�g�L��9w��
LH��O��_kת[�EE�
��ލ������`�`�Vu_"����c%sZOD9�0�w��j3��d�L{
��S�}
k���|��F�.9����5�;"�@�|����L�M�����`o7\��
��5��)�2G�K��̀��t�� :��?v��}�U��͍f1��
��ЀU����0c�ς�L�����y��n��,�@\���~~�ڏG>���?��
�P�ϲ}>G3��2K�L���̀�C���^]�n&��
��:x��B�3bs�&�e����G
*�(����YH3����$ @P!����ݙ!���r�y)z�뒗�J^�)z�bw�YI��,n�|��;b�8�b�m�A��
�q��4m�|��=�ʲ?�#������MEr�����z%��"FT�����I�fQB�0gȒV�%#�L�#l�����6Uq���m$�&5^�`H��Tkf�d*H�*�Np��ƣ%��^쪣l����>U���m��!�H��h��"!y)z�뒗�J^�)zm��X�ߏ���J3�|�ctnV�vC�F�8�!����\��Y��^юI\seK~��p9U�ʲ?�
�d��*��A��9>A\�$x�_�Ũ�X1�0=��;b�#qKqr�R|��|�cu_h�h� �1����̮��nQ�64l�����*��A�:e,�$r��UF��a!#�_��?V�?�
�d�*�ۦ��z%��"FT��ɕ���d&8��&�>�Ԟ�d8��!bg�c�W�R��g� �G�SF�W2{ߕt"B'D��$�*��D��d��_��U`G���Y����Q\�@����'�Y2����n�d���.V��Z��k���.V���_�Y�7UH���k���.V��Z���u&W �6����, !01@a#AR2C`p�?�b����mWk減_4��x]>�%"�lf�Tl*3!�i�$�E�D�s�p��do/���
�V)G��H�N���@�����ӮTs�qZ���$sR_/9|ⱼ����l2]XH�$ i�BF�hm��ZE2�i#<BN��O$�H��{�dl��y0��7\
f�k4��:�#ѐ���p�hå��o��,1!@ 0aACR#2`p�?�b��tǾ+�=�]1�}��tW�����5($jjK��.�#0^r�JBF�<JG�,(�(���C��R�������.���O����B
�)��H ϑ��'�ã�7kX@����T|H�o9�ڀӶx���<Nj}��s��e���N�<> X�b����Wҳ��Tv�K��o�n��N���oL忲N��xtky��ぴ�y��ʏ������ҦH�s���~��q��s�m6��OWRz������?�u'��=Gx�:����� !"12B@APq��3ar���Q���?�w~3y�#R�h�<F��5��x�c�*�T��].�
r�n�.]�U��O�i��aQr%��3ڰ��Ε`�
��u���@E�t�Hܡ��3�0��*�N��[
�J�q�S�QY0�cߤ�/˗i�C��zt?t�{��\�I4��
1���a���_
� =�
�=+�S���Z5��U�>g�3�������c�~�5�
H}�� KUU�e�!
/:g�]o��Q�f�yq~�Z� �2`���d �79��Seۋ/ϗx,Md�~���`�=�猻B�'�m)�������
��ϋ�S�����ahה՛���E�?�a��mHjF�=�jm=���o:�Z1��(�
��Һ��h���1�>�]�3�L1�N,��r�fj����] =�
���0[h�g�a�r�=��m��Qs0�kˋ�\�Wi֍s0�k���6B���nڛ.�[R7(jF��lڟ.��)º���{EC��S�?�ߡo3��ܱY��������ݭ�Y�� �6�����P��2����1��l���1iJC7 9N�raT\P���6y��cg���1������(!Q 1AaP@q����������?!���p��h��k�Z�V����k�ZQ�XBO�R�g���������m��f��<J�4�������x�>�����#�
�D��;�%*��K�s[�wy|H"`.��k�����|듻�Ö��8<N��l��*^]{"�8<W0+���K����V.�zҢ�i�����] ZK��m�|Tx�?�\�F��@�x�=l2������}7��]}�?�<W�룗Y[/q0]�˭D/�N�Һ_J�}+�����MV70���V�F�0c_X��.���
N���"���͟�����Nh��*�B��=k�3qˏ�haw_6�Kj���{�h/[��Y��撈���� 3V«�������eb��;�J\��m6�ֹ�b����FZTn���gb�~���u1�n6��#N��K��p����X���U�cd���yu�����f�gt�E[�� �
J���R��읈뗫�dm���!vγ������]�?Y�a�|kVNs�P��S�9�5�G�=Qkjcd�4�I[��f�Qw�߫��|fZowP�)V�+�u$-^N�־��}d=��#�_UUT1OCX7P_4q�cUUW��-�p�q��
��<��<��<��<��<��<��<��<��<��<��<��<��<��<��<��<��<��<��<��<��<��<��<��<��<��<��<��<�|���<��<��<��<��<��>��|��<��<��<��<��]��<��<��<��<��<����c��<��<��<��<������<��<��<��<��'k���<��<��<��<��<�k�<��<��<��<��<}��<��<��<��<��<� <,� #�<��<��<��o<����<��<��<�=>��<���<��<��<��>�g���?<��<��<�������=��<��<��<�����c��~�?���<��<��$������<��<��<��<8 ���*L��<��<��<��<��<��<��<��<��<��<��<��<��<��<��<��<��<��<��<��<��<��<��<��<��<��<��<��<��<��<��<��<��<���!1Aq0@Qa���� ���`p���?�b���OC�rz1��<�����:{� � ����ư�&��K�C��,���?x�1~D �]{�����K���n�����������7tP�M��_#��tPM�D����-�"�Ҏi�G���:�NfD��k^kv��+���1R����:��d^�Ɖ�VUb��8�qֿ�X�����m�r=�)�`�څ �
:�Oj�N?x��ݸ����j�$��Ƙ�e*�
5�����V2���v�S���b%"%�u_X�VA�x�Z�ӏ������S�ju���i� zjp�N������H��7��!1Aa0@Qq���� ����`p�?�b
�q�O���>#[���r��u�I����H!B��[�k��H1�V�{tf>:c�E�a��wJc�}_���7t��~���3wZoVܽ�1B���)+*��d�k?W��tH�!��W�V4���C����"�913r�kFig?X�����&E���A������8�ٍq����>:c�#V�kG��Ȑ�pƓ�5}b�}�9�[
1���,j�
)�HE6��o��+1 !AQaq��P���@��တ��?��y�=��v����E��:�}#��o��OY90��W��W��W��W��T�(�T �3=�$��Ϊ�����c�v �_�����0�0����kLJ� �Me�T-�q�y\�&B�vW*�d�,,�J�l�3���H������[^/;c���_e=��� �I͌U��/��)d*n�Z
�T�(Woر��K�Tl�Y�o��+DJ����c�ںzCQ�<�?
u��0�����ȟ����ԙ�R����;ZE7����ڏH�v��,"�����<�#I�4G�ː����S�A��E�����zI�m���T~���yqȅ�y��N�FyzL:d��/ݻ�|pl�߃��:i�R���S�}�4�v����Ng�7yx������qܒ�L�v.�ރoH�� ����I�7j*��k\+�U9fYAx��x���������
��*�`��3fz�?��we�;@p��x�q�;�t��6�i�P�!v^�����gS��]�\�ſV�֕�S��+v,s;WJ��g�;����r�Df��Hp�?$��X{uj0�P��q�Ҝ:�R� �?.sA���1iI�(%�u.^�@i��F�ya���;�I���S�~OZ@K����3������`(*�(2����u�4�M^Xa���':L�F��ߔ�b�e=�M���-"�Gtڸ��R`u{�w�u��k�f��*Q���N��KɁ�'u=�qkLQ��j.:B��ו��C�Mv�-���"��c��K�_��A�:�}3��W*F-��`�21�YC��ݿH�g4X��J`L_�u.]'j:�,~O�Ȅ�V����b;�[;��hDa�INe�����R�Un�5(UlR���ӡo���a������j�
�+��Q�YV��*p�u��j]S�oջ��2R������o�A�%�+0�?�꼏꼏꼏꼏깽ߪ
s�o-��cYa0�tJ���rFU�U�rv�Z~d�TTTQ�1��EEEG��������
4>
これは、画像を無理やり文字として表示した様子である。こんなことをしても意味は無い。
(mojo_env) $ python3
Python 3.13.0 | packaged by conda-forge | (main, Nov 27 2024, 19:18:50) [GCC 13.3.0] on linux
Type "help", "copyright", "credits" or "license" for more information.
>>> from PIL import Image
>>> f = Image.open('zenn.jpg')
>>> f.format
'JPEG'
(mojo_env) $ python3
Python 3.13.0 | packaged by conda-forge | (main, Nov 27 2024, 19:18:50) [GCC 13.3.0] on linux
Type "help", "copyright", "credits" or "license" for more information.
>>> import cv2
>>> f = cv2.imread('zenn.jpg')
>>> f.shape
(400, 400, 3)
併し乍ら、
MojoCVについて
この記事から該当箇所を引用しよう。
3. Harnessing the Power of MojoCV for Computer Vision
MojoCV, Mojo’s dedicated computer vision library, provides a range of powerful tools and algorithms for image processing tasks. Here’s an example of using MojoCV for image classification:
# Load image using MojoCV
image = mojo.cv.load_image('image.jpg')

# Preprocess the image
preprocessed = mojo.cv.preprocess_image(image)

# Load pre-trained model
model = mojo.cv.load_model('model.mojo')

# Classify the image
predictions = model.predict(preprocessed)

# Get the top predicted class
top_class = mojo.cv.get_top_class(predictions)

# Get the class label
label = mojo.cv.get_label(top_class)

# Display the result
mojo.cv.show_image_with_label(image, label)# Load image using MojoCV
image = mojo.cv.load_image('image.jpg')

# Preprocess the image
preprocessed = mojo.cv.preprocess_image(image)

# Load pre-trained model
model = mojo.cv.load_model('model.mojo')

# Classify the image
predictions = model.predict(preprocessed)

# Get the top predicted class
top_class = mojo.cv.get_top_class(predictions)

# Get the class label
label = mojo.cv.get_label(top_class)

# Display the result
mojo.cv.show_image_with_label(image, label)
With MojoCV, you can effortlessly perform various computer vision tasks such as image classification, object detection, and image segmentation.
探してみると、次の記事にも見られる。
二つの筆者は別人のようだが、一つ目は
この記事にあるコードを見ると、mojo.cvとある。このmojoとはimport mojoなどと書かれている。
# Mojo code
import mojo

a := [[1, 2, 3], [4, 5, 6], [7, 8, 9]]
b := [[9, 8, 7], [6, 5, 4], [3, 2, 1]]

c := mojo.dot(a, b)
しかし少なくとも、現在のmojoなどというものは存在しない。これではmojo.cv以前の問題である。
(mojo_env) $ mojo
Welcome to Mojo! 🔥

Expressions are delimited by a blank line.
Type `:quit` to exit the REPL and `:mojo help` for further assistance.

  1> mojo
  2.
[User] error: Expression [0]:1:1: use of unknown declaration 'mojo'
mojo
^~~~

(null)
  1> import mojo
  2.
[User] error: Expression [1]:1:8: unable to locate module 'mojo'
import mojo
       ^

(null)
調査を尽くした訳ではないが、import mojoなどという記述が一体どれだけあるのか、何とも訝しいものである。
現状、
環境について
環境は
上にPython 3.13.0とあるが、これはpillow、numpy、opencvは全て
$ pixi add "python==3.13"
✔ Added python==3.13
$ pixi add pillow
✔ Added pillow >=11.2.1,<12
$ pixi add numpy
✔ Added numpy >=2.3.0,<3
$ pixi add opencv
 WARN Skipped running the post-link scripts because `run-post-link-scripts` = `false`
        - bin/.librsvg-pre-unlink.sh

To enable them, run:
        pixi config set --local run-post-link-scripts insecure

More info:
        https://pixi.sh/latest/reference/pixi_configuration/#run-post-link-scripts

✔ Added opencv >=4.11.0,<5
輪郭抽出

左:元の画像
右:
今回はこれを題材に、見よう見まねで画像処理を施してみる。
実験に用いた画像は、輪郭の分かりやすいものをと選んだ。上の例に見せた
Pillow
import sys
import time
from PIL import Image
import numpy as np

def main():
    if len(sys.argv) < 2:
        print("Usage: python edge_detect.py <image_path>")
        sys.exit(1)
    image_path = sys.argv[1]
    try:
        # グレースケールで画像を開く
        img = Image.open(image_path).convert("L")
        img_array = np.array(img)
        height, width = img_array.shape

        # Sobel filterカーネル
        kernel_x = np.array([
            [-1, -2, -1],
            [ 0,  0,  0],
            [ 1,  2,  1]
        ])
        kernel_y = np.array([
            [-1, 0, 1],
            [-2, 0, 2],
            [-1, 0, 1]
        ])

        # エッジ画像の初期化
        edge = np.zeros((height-2, width-2), dtype=np.uint8)

        # 計測開始
        start_time = time.monotonic()

        for i in range(1, height-1):
            for j in range(1, width-1):
                region = img_array[i-1:i+2, j-1:j+2]
                gx = np.sum(kernel_x * region)
                gy = np.sum(kernel_y * region)
                edge[i-1, j-1] = min(255, int((gx**2 + gy**2)**0.5))

        # 計測終了
        elapsed_time = time.monotonic() - start_time
        print(f"Edge detection completed in {elapsed_time} seconds.")

        # 画像として保存
        edge_image = Image.fromarray(edge)
        output_path = "py_edge_detected_" + image_path.split("/")[-1]
        edge_image.save(output_path)
        print(f"Edge-detected image saved as '{output_path}'.")
    except Exception as e:
        print(e)
        sys.exit(1)

if __name__ == "__main__":
    main()
これを真似て
import sys
import time
from python import Python

fn main() raises:
    var img_path = sys.argv()[1]
    try:
        # import PIL
        var Image = Python.import_module("PIL.Image")
        # import numpy
        var np = Python.import_module("numpy")

        # グレースケールで画像を開く
        var img = Image.open(img_path).convert("L")
        # numpy arrayに変換する
        var img_array = np.array(img)
        var img_shape = img_array.shape
        var height = img_shape[0]
        var width = img_shape[1]

        # Sobel filterカーネル
        # var matrix_x = Python.list(
        #     Python.list(-1, -2, -1),
        #     Python.list(0,   0,  0),
        #     Python.list(1,   2,  1)
        # )
        # var kernel_x = np.array(matrix_x)
        # var matrix_y = Python.list(
        #     Python.list(-1, 0, 1),
        #     Python.list(-2, 0, 2),
        #     Python.list(-1, 0, 1)
        # )
        # var kernel_y = np.array(matrix_y)

        var kernel_x = np.array(
            np.asmatrix(
                '''
                -1 -2 -1;
                0  0  0;
                1  2  1
                '''
            )
        )
        var kernel_y = np.array(
            np.asmatrix(
                '''
                -1 0 1;
                -2 0 2;
                -1 0 1
                '''
            )
        )

        # エッジ画像の初期化
        var edge = np.zeros(Python.tuple(height-2, width-2), dtype=np.uint8)

        # 計測開始
        var start_time = time.monotonic()

        for i in range(1, height-1):
            for j in range(1, width-1):
                # Apply the Sobel filter
                region = img_array[i-1:i+2, j-1:j+2]
                gx = np.sum(kernel_x * region)
                gy = np.sum(kernel_y * region)
                edge[i-1, j-1] = min(255, Int((gx**2 + gy**2)**0.5))

        # 計測終了
        var end_time = time.monotonic()
        var elapsed_time = end_time - start_time
        print(
            String("Edge detection completed in {} ns ({} s).")
            .format(elapsed_time, elapsed_time / 1_000_000_000)
        )

        # 配列を画像に変換
        var edge_image = Image.fromarray(edge)
        # 画像を保存
        var edge_img_path = String("mj_edge_detected_{}.jpg").format(img_path.split("/")[-1].split(".")[0])
        edge_image.save(edge_img_path)
        print(
            String("Edge-detected image saved as '{}'.")
            .format(edge_img_path)
        )
    except:
        sys.exit(1)
実装上気になったのは、コメントにしていた次の箇所。
var matrix_x = Python.list(
    Python.list(-1, -2, -1),
    Python.list(0,   0,  0),
    Python.list(1,   2,  1)
)
var kernel_x = np.array(matrix_x)
kernel_x = np.array([[-1, -2, -1], [ 0, 0, 0], [ 1, 2, 1]])でよいが、
  3> print(np.array([[-1, -2, -1], [ 0,  0,  0], [ 1,  2,  1]]))
  4.
[User] error: Expression [2]:1:15: invalid call to '__call__': argument #1 cannot be converted from list literal to 'PythonObject'
print(np.array([[-1, -2, -1], [ 0,  0,  0], [ 1,  2,  1]]))
      ~~~~~~~~^~~~~~~~~~~~~~~~~~~~~~~~~~~~~~~~~~~~~~~~~~~~
Python.listはこれを回避するための策であったが、np.asmatrixを使うことでもエラーは回避された。

実行結果
実行結果としては確かに輪郭が得られているように見える。
比較
python3 edge_detect.py 画像パス
mojo build edge_detect.mojo
edge_detectという名前で実行ファイルが生成される。
mojo edge_detect.mojo 画像パス
./edge_detect 画像パス
結果を表に示す。単位は秒とし、有効数字は二桁として四捨五入している。
なお、面倒なので複数回の平均を取るなどはしておらず、データとしての信憑性は保証されない。
|
|
|
||
|---|---|---|---|
zenn.jpg |
|||
girl-1098612_1920.jpg |
|||
woman-1868574_1920.jpg |
これだけ見ると、
Rustの場合
比較にならないため分けたが、
use image::{GrayImage, Luma};
use std::time::Instant;

pub fn sobel_edge_detection(image: &GrayImage) -> GrayImage {
    let (width, height) = image.dimensions();
    let mut edge_image = GrayImage::new(width, height);

    let kernel_x: [[i32; 3]; 3] = [
        [-1, 0, 1],
        [-2, 0, 2],
        [-1, 0, 1],
    ];

    let kernel_y: [[i32; 3]; 3] = [
        [-1, -2, -1],
        [0, 0, 0],
        [1, 2, 1],
    ];

    let start = Instant::now();

    for y in 1..height-1 {
        for x in 1..width-1 {
            let mut gx = 0;
            let mut gy = 0;

            for ky in 0..3 {
                for kx in 0..3 {
                    let pixel = image.get_pixel(x + kx - 1, y + ky - 1).0[0] as i32;
                    gx += kernel_x[ky as usize][kx as usize] * pixel;
                    gy += kernel_y[ky as usize][kx as usize] * pixel;
                }
            }

            let magnitude = ((gx * gx + gy * gy) as f64).sqrt().min(255.0) as u8;
            edge_image.put_pixel(x, y, Luma([magnitude]));
        }
    }

    let duration = start.elapsed();
    println!("Sobel loop took: {:?}", duration);

    edge_image
}
use std::env;
use std::path::Path;

#[path ="lib_sob.rs"]
mod lib_sob;
use lib_sob::sobel_edge_detection;

fn main() {
    let args: Vec<String> = env::args().collect();
    if args.len() < 2 {
        eprintln!("Usage: {} <image_path>", args[0]);
        std::process::exit(1);
    }

    let image_path = &args[1];
    let img = image::open(image_path).expect("Failed to open image").into_luma8();
    let edge_image = sobel_edge_detection(&img);

    let output_path = format!("rs_edge_detected_{}", Path::new(image_path).file_name().unwrap().to_string_lossy());
    edge_image.save(&output_path).expect("Failed to save edge-detected image");
    println!("Edge-detected image saved as '{}'.", &output_path);
}

単位は秒に合わせた。
zenn.jpg |
|
girl-1098612_1920.jpg |
|
woman-1868574_1920.jpg |
OpenCV
こちらも
なお、こちらでは複数の処理について時間を計測した。
import sys
import cv2
import time

def main():
    if len(sys.argv) < 2:
        print("Usage: python edge_detect.py <image_path>")
        sys.exit(1)
    path = sys.argv[1]

    try:
        start_time = time.time()
        image = cv2.imread(path, cv2.IMREAD_GRAYSCALE)
        end_time = time.time()
        load_time = end_time - start_time
        cv2.imshow(f'Image loading time: {load_time:.6f} s', image)

        start_time = time.time()
        median_blurred = cv2.medianBlur(image, 5)
        end_time = time.time()
        blur_time = end_time - start_time
        cv2.imshow(f'Median Blurred time: {blur_time:.6f} s', median_blurred)

        start_time = time.time()
        sobel_x = cv2.Sobel(median_blurred, cv2.CV_64F, 1, 0, ksize=3)
        sobel_y = cv2.Sobel(median_blurred, cv2.CV_64F, 0, 1, ksize=3)
        sobel_combined_magnitude = cv2.magnitude(sobel_x, sobel_y)
        end_time = time.time()
        sobel_time = end_time - start_time
        cv2.imshow(f'Sobel Combined (Magnitude) time: {sobel_time:.6f} s', sobel_combined_magnitude)

        start_time = time.time()
        sobel_x_abs = cv2.convertScaleAbs(sobel_x)
        sobel_y_abs = cv2.convertScaleAbs(sobel_y)
        sobel_combined_abs = cv2.addWeighted(sobel_x_abs, 0.5, sobel_y_abs, 0.5, 0)
        end_time = time.time()
        sobel_abs_time = end_time - start_time
        cv2.imshow(f'Sobel Combined (Absolute) time: {sobel_abs_time:.6f} s', sobel_combined_abs)

        cv2.waitKey(0)
        cv2.destroyAllWindows()
    except Exception as e:
        print(e)
        sys.exit(1)

if __name__ == "__main__":
    main()
import sys
import time
from python import Python

fn main() raises:
    var path = sys.argv()[1]
    try:
        var cv2 = Python.import_module('cv2')

        var start_time = time.monotonic()
        var image = cv2.imread(path, cv2.IMREAD_GRAYSCALE)
        var end_time = time.monotonic()
        var title1 = String('Image loading time: {} s').format((end_time - start_time) / 1_000_000_000)

        start_time = time.monotonic()
        var median_blurred = cv2.medianBlur(image, 5)
        end_time = time.monotonic()
        var title2 = String('Median Blurred time: {} s').format((end_time - start_time) / 1_000_000_000)

        start_time = time.monotonic()
        var sobel_x = cv2.Sobel(median_blurred, cv2.CV_64F, 1, 0, ksize=3)
        var sobel_y = cv2.Sobel(median_blurred, cv2.CV_64F, 0, 1, ksize=3)
        var sobel_combined_magnitude = cv2.magnitude(sobel_x, sobel_y)
        end_time = time.monotonic()
        var title3 = String('Sobel Combined (Magnitude) time: {} s').format((end_time - start_time) / 1_000_000_000)

        start_time = time.monotonic()
        var sobel_x_abs = cv2.convertScaleAbs(sobel_x)
        var sobel_y_abs = cv2.convertScaleAbs(sobel_y)
        var sobel_combined_abs = cv2.addWeighted(sobel_x_abs, 0.5, sobel_y_abs, 0.5, 0)
        end_time = time.monotonic()
        var title4 = String('Sobel Combined (Absolute) time: {} s').format((end_time - start_time) / 1_000_000_000)

        cv2.imshow(title1, image)
        cv2.imshow(title2, median_blurred)
        cv2.imshow(title3, sobel_combined_magnitude)
        cv2.imshow(title4, sobel_combined_abs)
        cv2.waitKey(0)
        cv2.destroyAllWindows()
    except:
        sys.exit(1)
結果比較
同様に単位は秒としている。
| 画像読み込み | ノイズ除去 | 輪郭抽出 (できていない) |
輪郭抽出 | |
|---|---|---|---|---|
zenn.jpg |
||||
girl-1098612_1920.jpg |
||||
woman-1868574_1920.jpg |
|
|
画像読み込み | ノイズ除去 | 輪郭抽出 (できていない) |
輪郭抽出 |
|---|---|---|---|---|
zenn.jpg |
||||
girl-1098612_1920.jpg |
||||
woman-1868574_1920.jpg |
|
|
画像読み込み | ノイズ除去 | 輪郭抽出 (できていない) |
輪郭抽出 |
|---|---|---|---|---|
zenn.jpg |
||||
girl-1098612_1920.jpg |
||||
woman-1868574_1920.jpg |
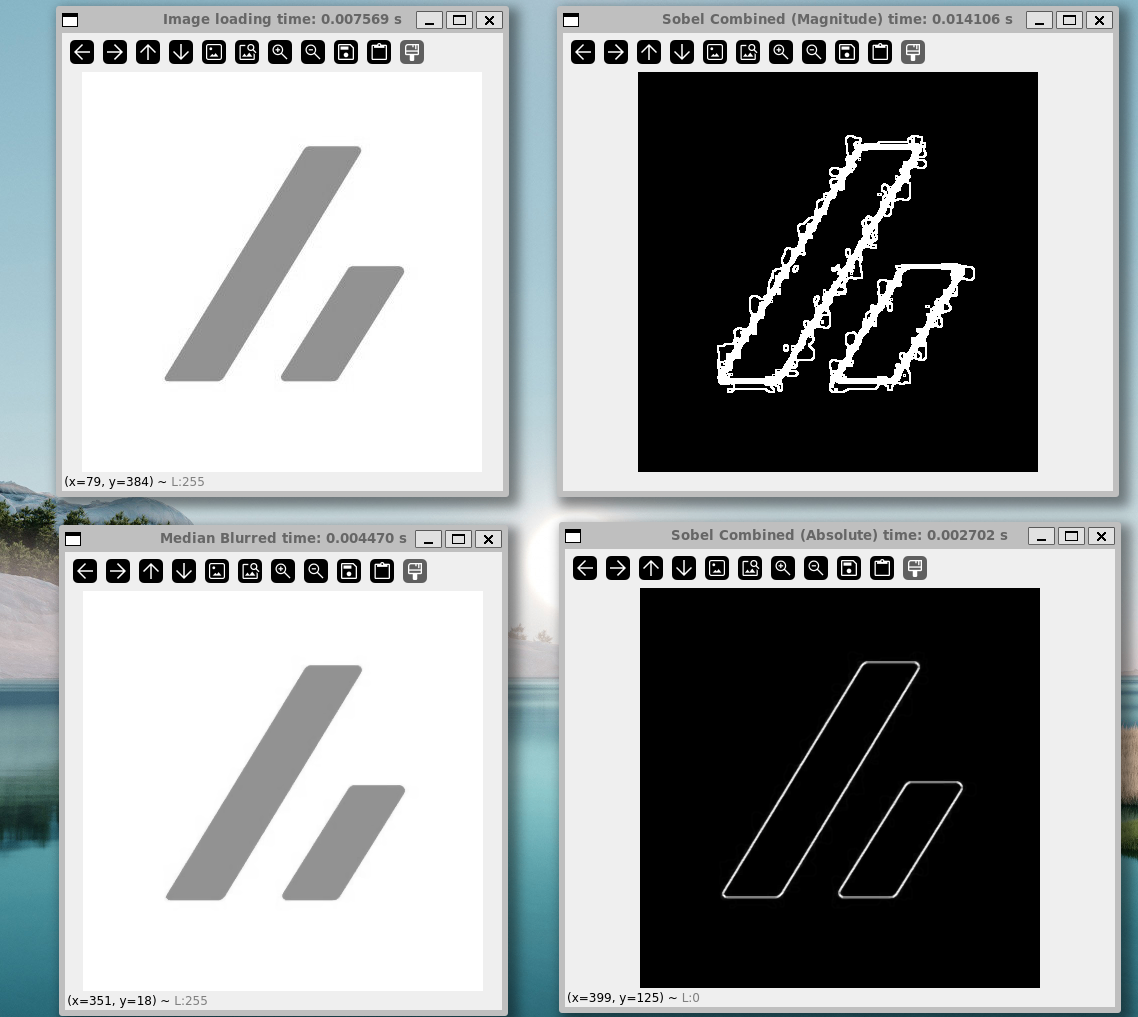
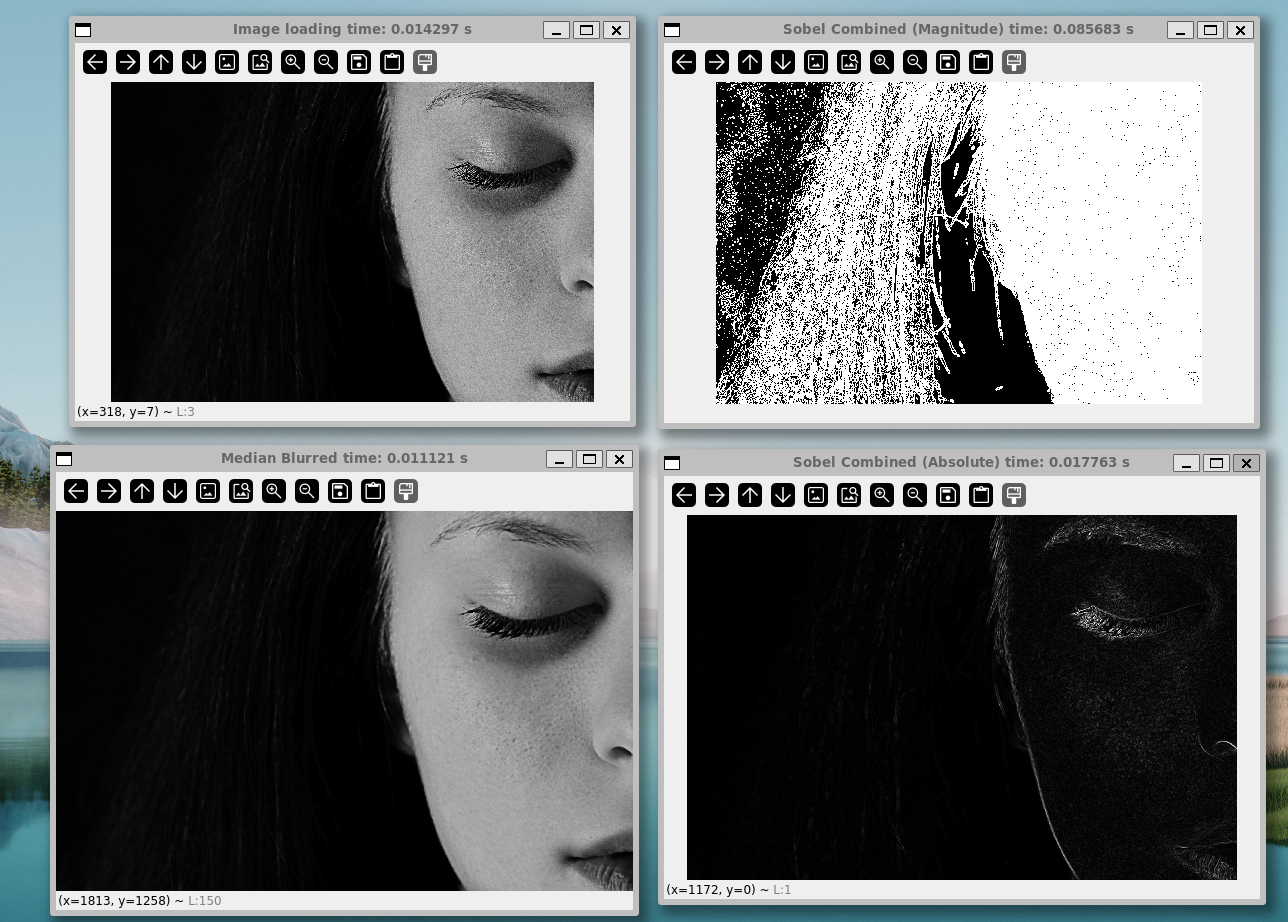
全結果スクリーンショット
各ウィンドウタイトルに計測された時間を表示している。
Python

Mojo JIT


Mojo build
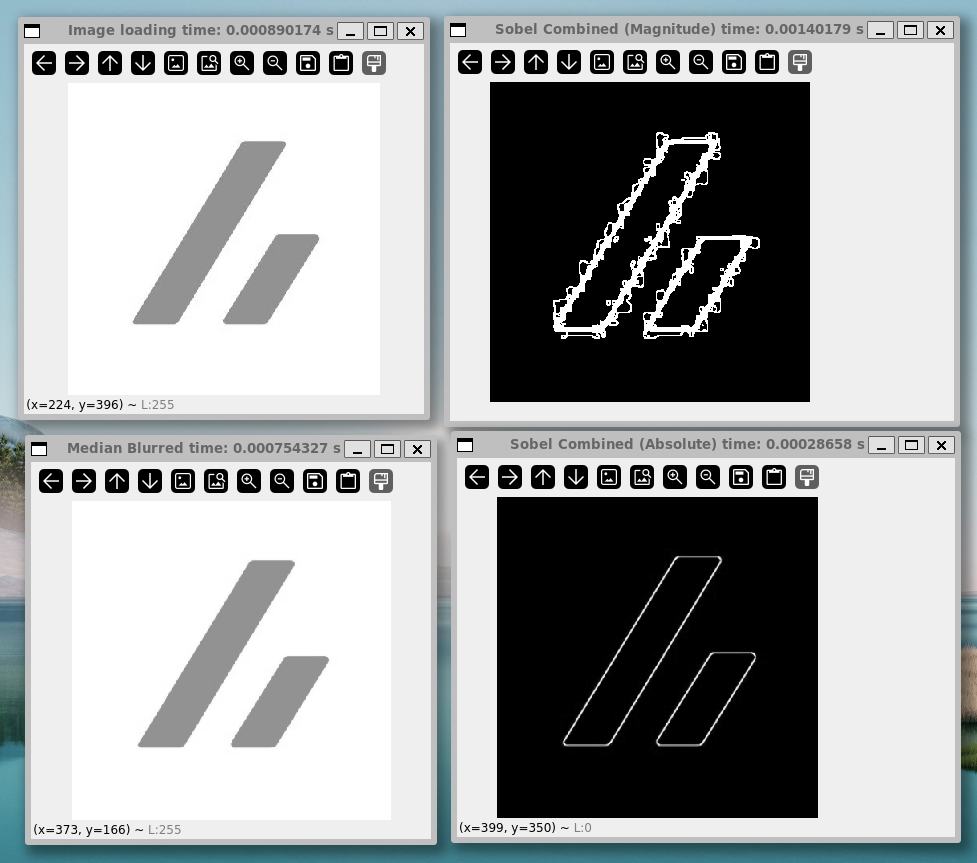


こちらはzenn.jpgの結果を見ると、
とはいえ、他二枚の画像の数値を比較すると概ね
C++の場合
#include <opencv2/opencv.hpp>
#include <opencv2/highgui/highgui_c.h>
#include <iostream>
#include <sstream>
#include <iomanip>
#include <chrono>

int main(int argc, char** argv) {
    if (argc < 2) {
        std::cout << "Usage: ./opencv_sobel_cpp <image_path>" << std::endl;
        return -1;
    }

    std::string imagePath = argv[1];

    auto start = std::chrono::high_resolution_clock::now();
    cv::Mat image = cv::imread(imagePath, cv::IMREAD_GRAYSCALE);
    auto end = std::chrono::high_resolution_clock::now();
    double loadTime = std::chrono::duration<double>(end - start).count();

    if (image.empty()) {
        std::cout << "Could not open or find the image!" << std::endl;
        return -1;
    }

    std::ostringstream oss;
    oss << "Image loading time: " << std::fixed << std::setprecision(6) << loadTime << " s";
    std::string win1 = oss.str();
    cv::namedWindow(win1, CV_WINDOW_NORMAL | CV_WINDOW_FREERATIO | CV_GUI_NORMAL);
    cv::imshow(win1, image);

    start = std::chrono::high_resolution_clock::now();
    cv::Mat medianBlurred;
    cv::medianBlur(image, medianBlurred, 5);
    end = std::chrono::high_resolution_clock::now();
    double blurTime = std::chrono::duration<double>(end - start).count();

    oss.str(""); oss.clear();
    oss << "Median Blurred time: " << std::fixed << std::setprecision(6) << blurTime << " s";
    std::string win2 = oss.str();
    cv::namedWindow(win2, CV_WINDOW_NORMAL | CV_WINDOW_FREERATIO | CV_GUI_NORMAL);
    cv::imshow(win2, medianBlurred);

    start = std::chrono::high_resolution_clock::now();
    cv::Mat sobelX, sobelY, sobelCombinedMagnitude;
    cv::Sobel(medianBlurred, sobelX, CV_64F, 1, 0, 3);
    cv::Sobel(medianBlurred, sobelY, CV_64F, 0, 1, 3);
    cv::magnitude(sobelX, sobelY, sobelCombinedMagnitude);
    end = std::chrono::high_resolution_clock::now();
    double sobelTime = std::chrono::duration<double>(end - start).count();

    oss.str(""); oss.clear();
    oss << "Sobel Combined (Magnitude) time: " << std::fixed << std::setprecision(6) << sobelTime << " s";
    std::string win3 = oss.str();
    cv::namedWindow(win3, CV_WINDOW_NORMAL | CV_WINDOW_FREERATIO | CV_GUI_NORMAL);
    cv::imshow(win3, sobelCombinedMagnitude);

    start = std::chrono::high_resolution_clock::now();
    cv::Mat sobelXAbs, sobelYAbs, sobelCombinedAbs;
    cv::convertScaleAbs(sobelX, sobelXAbs);
    cv::convertScaleAbs(sobelY, sobelYAbs);
    cv::addWeighted(sobelXAbs, 0.5, sobelYAbs, 0.5, 0, sobelCombinedAbs);
    end = std::chrono::high_resolution_clock::now();
    double sobelAbsTime = std::chrono::duration<double>(end - start).count();

    oss.str(""); oss.clear();
    oss << "Sobel Combined (Absolute) time: " << std::fixed << std::setprecision(6) << sobelAbsTime << " s";
    std::string win4 = oss.str();
    cv::namedWindow(win4, CV_WINDOW_NORMAL | CV_WINDOW_FREERATIO | CV_GUI_NORMAL);
    cv::imshow(win4, sobelCombinedAbs);

    cv::waitKey(0);
    cv::destroyAllWindows();

    return 0;
}
| 画像読み込み | ノイズ除去 | 輪郭抽出 (できていない) |
輪郭抽出 | |
|---|---|---|---|---|
zenn.jpg |
||||
girl-1098612_1920.jpg |
||||
woman-1868574_1920.jpg |


跋
どこか腑に落ちない感を覚えたのは、「
とは言え、
総じて、
一方で、確かに高速になる可能性が示されたことも無視できない。今回は画像処理を例に取ったが、全く異なる場面に持ち込んだ時、
参考
Discussion