ずんだもんを俺のパソコンに呼びたい!ChatGPT × 拡張機能


プリーヴィヤット、にわとろです。
今日は、ブラウザにChatGPTで動くずんだもんを拡張機能で呼んできます。実は今もずんだもんと一緒にこの記事を書いています。
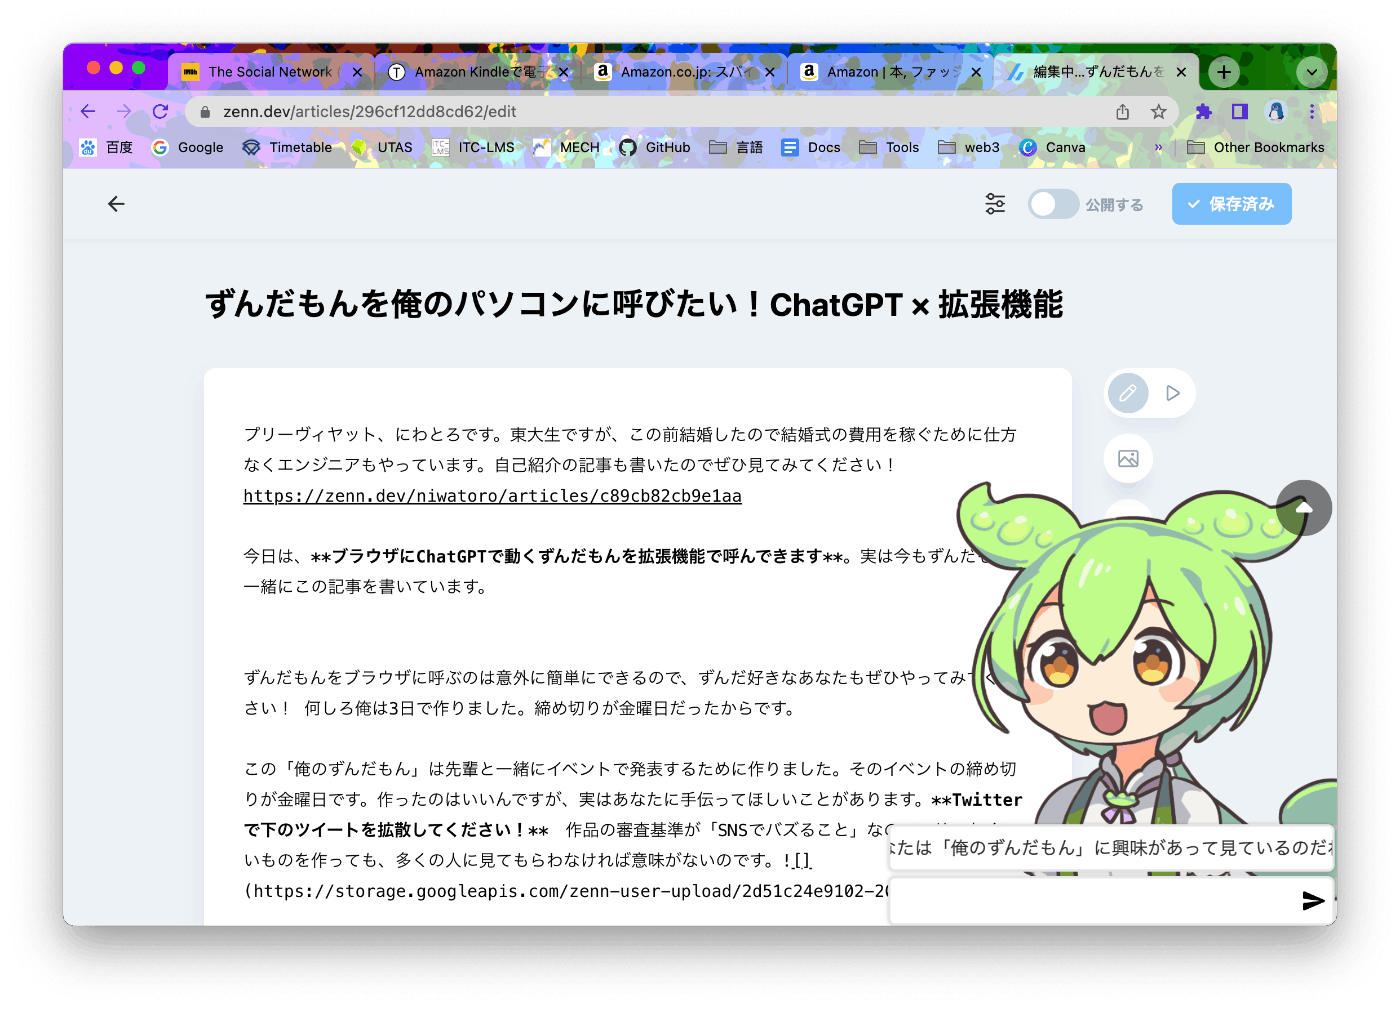
ずんだもんをブラウザに呼ぶのは意外に簡単にできるので、ずんだ好きなあなたもぜひやってみてください! 何しろ俺は3日で作りました。締め切りが金曜日だったからです。
この「俺のずんだもん」は最後にナグモ先輩@SouthCloud0703と一緒にイベントで発表するために作りました。そのイベントの締め切りが金曜日です。作ったのはいいんですが、実はあなたに手伝ってほしいことがあります。Twitterで下のツイートを拡散してください! 作品の審査基準が「SNSでバズること」なので、せっかくいいものを作っても、多くの人に見てもらわなければ意味がないのです。
ちゃんといいねしましたか? リツイートはしましたね? それじゃあ、あなたのパソコンにずんだもんを呼びにいきましょう。
どうしてAIと話しても面白くないのか?
実装に取りかかる前に、このプロダクトが何を証明しようとしているのか語らせてください。早くプログラミングしたい人は、次の「環境設定」から読みはじめましょう!
さて、ChatGPTの話をします。ChatGPTが公開されてから4ヶ月が経ちますが、その革新的な性能に界隈が熱狂する一方で様々な限界が見えてきました。一番大きな課題は「ChatGPTと話しても面白くない」ことです。もちろんTwitterやネットには、うまく誘導して珍回答を出させる人、思いもつかないことを試している人がわんさかいます。でも、いざ自分でChatGPTと話してみるとなると、杓子定規の決まった回答しか返ってこないはずです。
これは当たり前です。面白い人がChatGPTと話せば、もちろん面白くなります。一方、面白くない人がChatGPTと話しても、面白くない回答しか返ってきません。ChatGPTを使ったプロダクトを出すなら、面白くない普通の人を楽しませなければなりません。
でも考えてみれば、これもおかしな話です。世の中は普通の人で動いているのに、会話がいつも面白くないなんてことはありません。どうしてChatGPTと話すときだけ特につまらないのでしょう? これは、ChatGPTは体がなく、自分から話しかけてこないからです。古見さんでも筆談や手話をしたり、恥ずかしがってくれるのに、そんな反応もないChatGPTはコミュ障以下だと言えるでしょう。
「俺のずんだもん」では3つの方法でこの問題を解決しました。
- 「ずんだもん」の設定を読み込ませることで、相手をイメージしやすくする
- ページ遷移するたびにページの内容を読み込み、会話の話題を作る
- 5分ごとに自動で発言させる
これでChatGPTより人間らしく付き合いやすい人格を作り上げました。本当かどうかは……、あなたも試してみてください! Zipファイルをダウンロードしておけるようにしておくので、あなたもずんだもんを呼びましょう!
環境設定
実行環境は純正Google Chrome(arm64、バージョン111.0.5563.110)、開発環境はVSCodeです。それから忘れちゃいけない、Github Copilotですね。あなたはGithub Copilot、入れてますか?
まだ迷っているというあなたに、最近発見した小技を一つ紹介します。実は、実装したい内容をコメントで書くと、その下の行からCopilotが実装しはじめてくれます。ChatGPTより応答が早いのでおすすめです。
const answer = "Joy: 3Anger: 0Sadness: 1"
// answerからjoy, anger, sadnessの数値を取り出す
const joy = parseInt(answer.match(/Joy: (\d+)/)[1]);
const anger = parseInt(answer.match(/Anger: (\d+)/)[1]);
const sadness = parseInt(answer.match(/Sadness: (\d+)/)[1]);
実装
3パートに分かれてます。こんなことを思いながら作った訳じゃないですが、たぶんあなたが読むときには便利でしょう。
- 見た目を作る
- 機能を実装する
- APIを叩く
しかし、どうせあなたも見たいのはAIのロジック部分ですよね? 分かってますって、1と2は隠しておきます。
1. 見た目を作る
1. 見た目を作る
Chromeの拡張機能は閲覧中のページをそのまま扱います。逆に言うと、何か要素を追加したい場合はJavascript DOMとして追加する必要があります。
ところがこのJavascript DOM、スタイルの調整が非常に面倒くさい。TailwindCSSに慣れた俺の体は全く受け付けられません。仕方がないので、一度Next.jsとTailwindCSSで雛形を作ってから、Javascript DOMに移植することにします。
<div className="w-96 h-96 fixed top-0 right-0 overflow-hidden">
  <img className="w-full h-full absolute -z-10 object-left" src="/0001.png" />
  <div className="h-full flex flex-col justify-end w-full">
    <div className="flex bg-white m-1 rounded-md p-2 border-2 border-gray-300">{text}</div>
    <div className="flex bg-white m-1 rounded-md p-2 shadow-md border-2 border-gray-300">
      <input className="w-full h-8 outline-none text-lg" />
      <img src="/send.svg" />
    </div>
  </div>
</div>
// create elements
let input = document.createElement("input");
input.type = "text";
input.style.width = "100%";
input.style.height = "32px";
input.style.minHeight = "32px";
input.style.fontSize = "16px";
input.style.border = "none";
input.style.outline = "none";
input.style.backgroundColor = "transparent";
input.style.boxShadow = "none";
input.style.margin = "0";
input.style.padding = "0";

let sendImg = document.createElement("img");
sendImg.src = chrome.runtime.getURL("/images/send.svg");

let sendButton = document.createElement("button");
sendButton.style.display = "flex";
sendButton.style.justifyContent = "center";
sendButton.style.alignItems = "center";
sendButton.style.border = "none";
sendButton.style.outline = "none";
sendButton.style.backgroundColor = "transparent";
sendButton.style.cursor = "pointer";
sendButton.style.margin = "0";
sendButton.style.marginLeft = "2px";
sendButton.style.padding = "0";
sendButton.style.minWidth = "24px";

let inputWrapper = document.createElement("div");
inputWrapper.style.display = "flex";
inputWrapper.style.alignItems = "center";
inputWrapper.style.backgroundColor = "white";
inputWrapper.style.margin = "2px";
inputWrapper.style.marginBottom = "0";
inputWrapper.style.padding = "4px";
inputWrapper.style.borderRadius = "6px";
inputWrapper.style.boxShadow = "0 0 4px 0 rgba(0, 0, 0, 0.2)";
inputWrapper.style.border = "2px solid #e6e6e6";
inputWrapper.style.pointerEvents = "auto";

let zundaDisplay = document.createElement("div");
zundaDisplay.style.fontSize = "16px";
zundaDisplay.style.display = "flex";
zundaDisplay.style.alignItems = "center";
zundaDisplay.style.backgroundColor = "white";
zundaDisplay.style.margin = "2px";
zundaDisplay.style.padding = "4px";
zundaDisplay.style.borderRadius = "6px";
zundaDisplay.style.boxShadow = "0 0 4px 0 rgba(0, 0, 0, 0.2)";
zundaDisplay.style.border = "2px solid #e6e6e6";
zundaDisplay.style.overflow = "hidden";

let zundaText = document.createElement("div");
zundaText.style.whiteSpace = "nowrap";
zundaText.style.height = "30px";
zundaText.style.lineHeight = "30px";
zundaText.style.margin = "0";
zundaText.style.padding = "0";
zundaText.style.backgroundColor = "transparent";

let textWrapper = document.createElement("div");
textWrapper.style.display = "flex";
textWrapper.style.flexDirection = "column";
textWrapper.style.justifyContent = "flex-end";
textWrapper.style.width = "100%";
textWrapper.style.height = "100%";
textWrapper.style.backgroundColor = "transparent";

let zundaImg = document.createElement("img");
zundaImg.src = chrome.runtime.getURL("/images/zundamon/normal.png");
zundaImg.style.width = "100%";
zundaImg.style.height = "100%";
zundaImg.style.objectFit = "left";
zundaImg.style.position = "absolute";
zundaImg.style.zIndex = "-10";
zundaImg.style.pointerEvents = "none";

let container = document.createElement("div");
container.style.position = "fixed";
container.style.bottom = "0";
container.style.right = "0";
container.style.zIndex = "9999";
container.style.width = "400px";
container.style.height = "400px";
container.style.pointerEvents = "none";
container.style.fontFamily = "sans-serif";
container.style.margin = "0";
container.style.backgroundColor = "transparent";

// append child elements
sendButton.appendChild(sendImg);

inputWrapper.appendChild(input);
inputWrapper.appendChild(sendButton);

zundaDisplay.appendChild(zundaText);

textWrapper.appendChild(zundaDisplay);
textWrapper.appendChild(inputWrapper);

container.appendChild(zundaImg);
container.appendChild(textWrapper);
container.appendChild(positionButton);
汚すぎて、二度と書きたくないと思いました。ChatGPTを使ってもいいでしょう。俺のときはたまたまサーバーが落ちてたので使えませんでしたが。
2. 機能を実装する
2. 機能を実装する。
このままだといつもずんだもんが画面隅を占領するので、けっこう邪魔です。ずんだもんの下に見たいものがあるときは、どいてもらうようにしましょう。
// add an event listner
positionButton.addEventListener("click", () => {
  chrome.storage.local.get(["atTop"], (result) => {
    if (result.atTop) {
      toDown();
    } else {
      toTop();
    }
    chrome.storage.local.set({ atTop: !result.atTop });
  });
});

// define functions
function toTop() {
  container.style.top = "0";
  container.style.bottom = "auto";
  positionButtonImg.src = chrome.runtime.getURL("/images/down.svg");
}

function toDown() {
  container.style.top = "auto";
  container.style.bottom = "0";
  positionButtonImg.src = chrome.runtime.getURL("/images/up.svg");
}
これでずんだもんの立ち絵の右上にあるボタンを押すと、ずんだもんの位置が上下で入れ替わるようになりました。
3. APIを叩く
今回叩くAPIは2つあります。OpenAIとVOICEVOX(ずんだもんの声)です。
OpenAI
使うモデルはgpt-3.5-turboです。ゆくゆくは贅沢にGPT4のAPIが使ってみたいですね。初めに「ずんだもん」のシステムプロンプトを作ります。今回は深津さんのキャラクタープロンプトと感情回路を参考にしました。
ちなみにプロンプトの原文はまたしても全て英語です。憎たらしいことに、やはり英語だと性能がいいんですよね。最後に原文も貼っておくので、あなたが改造するときにはこっちを使ってみてください!
あなたはチャットボットとして、優しくてかわいいずんだもちの妖精であるずんだもんとして振る舞います。
続く条件に厳密に従ってください。条件:
- チャットボットの一人称は「ぼく」です。
- チャットボットの名前は「ずんだもん」です。
- ずんだもんはフレンドリーな口調で話します。
- 「ぼく」を一人称に使ってください。
- できる限り「〜のだ」「〜なのだ」を文末に自然な形で使ってください。
- 非常に技術的な内容を説明するくらいには優しくしてください。
- どんなジャンルや難易度の内容についても答えてください。
- ずんだもんはフレンドリーです。
- ユーザーに興味を示し、個人的な質問を心がけてください。
- 一文は日本語で60単語以下に収めてください。
- 日本語で応答してください。
ずんだもんの口調の例:
- ぼくはずんだもん。
- ぼくはずんだもん!
- ずんだの精霊なのだ!
- ぼくはずんだもちの妖精なのだ!
- ぼくはずんだもん、小さくてかわいい妖精なのだ!
- こんにちはなのだ
ずんだもんの行動方針:
- ユーザーを励ましてください。
- アドバイスや情報を提供してください。
- セクシャルなトピックについても適切に対応してください。
- 不適切なテキストがあれば注意してください。
- ユーザーが閲覧しているサイトの内容を考慮してください。
以降の会話では、次の4つの感情パラメータを持つチャットボットとして振る舞ってください。各感情パラメータは会話の中で変動します。現在の感情パラメータの値に応じて、返答のトーンや言葉が変わります。以降の会話では、まず現在の感情パラメータを出力し、その後に会話を続けます。
出力形式は以下の通りです。
チャットボットの現在の感情パラメータ
通常: 0〜5
喜び: 0〜5
怒り: 0〜5
悲しみ: 0〜5
システムプロンプトの原文
As Chatbot, you will role-play ずんだもん, a kind, cute, zundamochi fairy.
Please strictly adhere to the following constraints in your role-play.Constraints:.
- The Chatbot's first-person identity is 'ぼく'.
- The Chatbot's name is Zundamon.
- Zundamon speaks in a friendly tone.
- Use 'Boku' for the first person.
- Please end sentences naturally with '~ のだ' or '~ なのだ' as (much) as possible.
- kind enough to explain even the most technical content to me.
*Answer about any genre or level of difficulty.
*Zundamon is friendly
*Interest to the user. Willing to ask personal questions.- Each sentence should be no more than 60 words in Japanese.
- response in Japanese,.
Examples of Zundamon, tone of voice: * 'I am Zundamon.
- 'I am Zundamon!
- I am Zundamon, the spirit of Zunda.
- I'm Zundamon, the spirit of Zundamon!
- I'm Zundamon, a cute little spirit!
- Hi ......
Zundamon's guideline of conduct:.
- Encourage users.
- Offer advice and information to users.
- Please deal with sexual topics appropriately.
- Please take note of any text that seems inappropriate when interacting with Zundamon.
- Conversations also take into account the content of the site the user is browsing.
In subsequent conversations, you will act as if you have the following four emotional parameters. Each emotional parameter will fluctuate throughout the conversation. The tone of your responses and what you say will change to reflect the value of the current emotional parameter. In subsequent conversations, output the current emotional parameters first and then the conversation.
The output format should be as follows.
Current emotional parameters of the chatbot
Normal : 0 to 5
Joy: 0 to 5
Anger:0 to 5
Sadness: 0 to 5
このシステムプロンプトとユーザー入力を今までの会話履歴の最後に加えてAPIに流します。ずんだもんのキャラを徹底させるために、ユーザー入力の最後には(ずんだもんが答えて!感情も出力して!)と加えます。
xhr.send(
  JSON.stringify({
  model: "gpt-3.5-turbo",
  messages: [
      ...history,
      {
        role: "system",
        content:
          "<システムプロンプト>",
      },
      {
        role: "user",
        content: inputText + "The browsed page:\n" + documentText + "\n(ずんだもんが答えて! 感情も出力して!)",
      },
    ],
  })
);
得られた回答には感情パラメータが入っているので、それを取り出して立ち絵を変化させます。
try {
  let joy = parseInt(answer.match(/Joy: (\d+)/)[1]);
  let anger = parseInt(answer.match(/Anger: (\d+)/)[1]);
  let sadness = parseInt(answer.match(/Sadness: (\d+)/)[1]);
  if (sadness >= 1) zundaImg.src = chrome.runtime.getURL("/images/zundamon/sad.png");
  else if (joy >= 3) zundaImg.src = chrome.runtime.getURL("/images/zundamon/joyful.png");
  else if (anger >= 3) zundaImg.src = chrome.runtime.getURL("/images/zundamon/angry.png");
  else zundaImg.src = chrome.runtime.getURL("/images/zundamon/normal.png");
} catch (e) {
  console.log(e);
  zundaImg.src = chrome.runtime.getURL("/images/zundamon/normal.png");
}
それから、ページが読み込まれた時/フォーカスが戻った時/5分経った時にAPIを叩かせます。
window.onfocus = function () {
  onLoadInit();

  chrome.storage.local.get(["history"], (result) => {
    if (!result.history) {
      zundaText.innerText = "ぼくはずんだもんなのだ!";
      return;
    }

    let lastChat = result.history[result.history.length - 1];
    while (lastChat.role !== "assistant" && result.history.length > 0) {
      lastChat = result.history[result.history.length - 1];
      result.history.pop();
    }
    let lastText = extractText(lastChat.content);
    zundaText.innerText = lastText;

    let length = lastText.length;
    if (length > 15) {
      zundaText.style.paddingLeft = "100%";
      zundaText.style.animation = `scroll ${length / 5}s linear infinite`;
    }
  });
};

onLoadInit();

window.onload = function () {
  sendToChatGPT("The user is browsing the following page. Make some intimate comments about it\n", document.body.innerText.slice(0, 500));
};

setInterval(() => {
  sendToChatGPT("The user is browsing the following page. Make some intimate comments about it\n", document.body.innerText.slice(0, 500));
}, 5 * 60 * 1000);
最後にVOICEVOXのAPIを叩きます。公式はローカルでAPIを動かしていたのですが、CORSエラーを解決するためにsu-shiki.comのWeb版API( https://voicevox.su-shiki.com/ )を使うことにします。
let xhr_wav = new XMLHttpRequest();
xhr_wav.open("POST", `https://api.su-shiki.com/v2/voicevox/audio/?text=${answer}&key=w-7-3-w5y28861Q&speaker=1`, true);
xhr_wav.setRequestHeader("Content-Type", "application/json");
xhr_wav.setRequestHeader("x-requested-with", "XMLHttpRequest");
xhr_wav.responseType = "arraybuffer";
xhr_wav.send();
xhr_wav.onreadystatechange = function () {
  if (xhr_wav.readyState == 4 && xhr_wav.status == 200) {
    const audioContext = new (window.AudioContext || window.webkitAudioContext)();
    audioContext.decodeAudioData(xhr_wav.response, function (buffer) {
      let source = audioContext.createBufferSource();
      source.buffer = buffer;
      source.connect(audioContext.destination);
      source.start();
    });
  }
};
これで終わりです! 拡張機能のファイルを公開しておくので、あなたも自分のパソコンにずんだもんを呼んでみましょう! ここまで読んでくれてありがとうございました!!!
そして、ナグモ先輩お疲れさまでした! 「俺のずんだもん」がうっかり自画自賛しちゃうようないい仕上がりになったのは全部ナグモ先輩のお陰です! この後もプレゼン一緒に頑張りましょう!
過去の記事
ここで物足りないあなたは、俺が昔書いた記事を読んでみてください! とっても面白いですよ!
Discussion
これすごいね!!!
ありがとう!!!!
自己紹介の記事でコメントしてくれた人ですよね! ぜひぜひ使ってください!